Take this one I am about to share....
I was going through my Instagram feeds and came across a post from Stencil Girl (@stencilgirl_products) for their Blog Hop. It was a posting of an image from Mary Beth Shaw. I took a screen shot and thought, I'll get back to this later (a usual practice of mine). Well, I simply couldn't get it out of my head so off I headed to the shop to see what I could do with it.

So often, I avoid going to the source of the inspiration as I want to see how my take and process on it compares to how theirs. Well, I tell you, this one - I was WAY off. But honestly...I so enjoyed my process and my outcome, I really don't think it matters.
Wanted to continue to use my brayer as I so love the texture I can get out of it. The funny thing this time around was that I couldn't get the lid off my regular gesso, and my Super Heavy one was right there...taunting me...so I grabbed it and it opened easily (of course). Anyone who has used this product in the past, know just how thick SUPER HEAVY Gesso really is (yes, it really is)! Trying to spread with the brayer was a chore, so I thought..."Hey, let's spritz it with water. What's the worst that can happen?" Well, let's just say - NOTHING (inserting happy dance)! The texture I got from it was amazeballs!! I went on similar to regular wall paint and roller. Only here, the texture did NOT go away.


Once it was dried, I went on with my next coat of paint - DecoArt Media Fluid Acrylics Raw Sienna. I allowed it to almost dry then started rubbing it with a baby wipe. Check out the texture and the look...just like worn leather! Luscious isn't it?!


Time to add some more layers. You can see through the DecoArt Media Antiquing Cream Patina Green which I applied using a brush this time as I did not want full coverage.

Once it was totally dried, I took a homemade stencil of 1" squares and rubbed off areas 'randomly'.
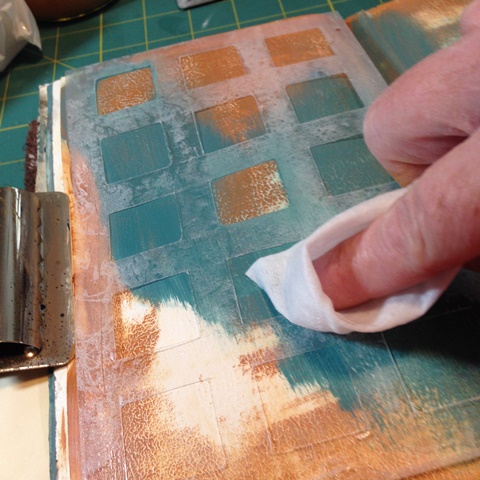
Now it was time to bring out the Dorland's was again (so love this stuff), and swiped it in areas so could create the peeled paint effect.

Once I let it set for a few minutes, I once again used my brayer to apply DecoArt Media Antiquing Cream Raw Umber .

Once I let it dry, I used three different stencils to get the shapes I was after. I used the Dina Wakley Media Stencil Mosaic Swirl, Stencil Girl Stencil Seth Apter's Numbers (L184) and my homemade one (1" squares). I randomly rubbed off in areas I thought worked.

Not wanting to lose the background (in case I really screwed up the next step), I put down a layer of Matte Medium

Why you ask...this is why! I wanted some green on the page (DecoArt Media Fluid Acrylic Green Gold). What if I hated it? What if it didn't work out? That is why! But note to self...maybe don't totally heat set it with the heat tool next time!! There was a lot of hard work rubbing off the paint I didn't want!


Missed taking a picture at this point, but let's just say - this is why there is yet another layer of DecoArt Media Antiquing Cream in English Red Oxide along eith some Dorland's Wax.

You see here where the paint separates from the base, it is becasue I am using a heat tool and that heats up the wax and the clay in the antiquing cream. This is great when you are not sure where you applied your wax!

Time to rub it all off! Not liking it at all at this point. You can see now where what was left of the green before I added the antiquing cream.

Too green for me, so hey, let's add some more DecoArt Media Fluid Acrylic Quinacridone Red (applied with my brayer).
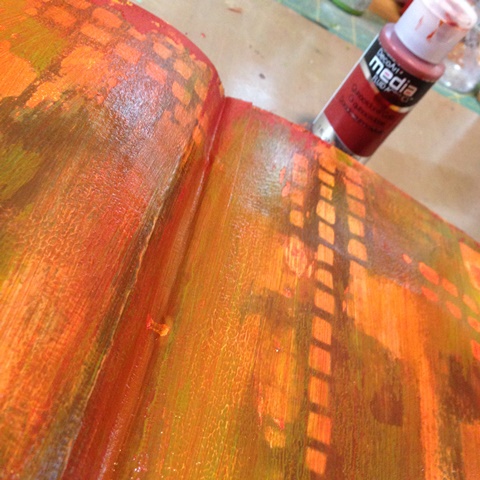
Yep, now I'm getting there!

Time for some DecoArt Media Fluid Acrylic Titan Buff over yet more Dorland's Wax (used sparingly this time). I ended up using way too much Titan Buff but really loved how the brayer produced lines along the page, made it look like fence boards, until....

I went at it with my baby wipes! Here are a few angles to get up close and personal!


So one would think they would be happy and walk away! Not me! Wanted yet more grunge, so applied more wax and DecoArt Media Antiquing Cream Carbon Black. Left side I used the wax, right side - no wax, just wanted to see how the two would differ.


Once dried, I started rubbing off with a baby wipe through a stencil (right side only).


Didn't really like it, so took the baby wipe to the entire page(s)

Still wanted some black, so had these Tim Holtz Remnant Rub Ons (Numbers) on my table so decided to add them here and there.

Really thought it still needed something, so I pulled out my Dina Wakley Media Heavy Body Acrylic Paint in Black with the Fine Tip Applicator attached (awesome) created a grid.

Then using my Dina Wakley Media Palette Knife on it's edge, swiped along the lines so it was not too crisp.


Really liking how it turned. But was I done....
Nope! Took my Faber Castell Pitt Artist Big Brush Pens and added some 'shading' and colors to bring it all together.


Blending along with way with my finger (after dabbing it on a baby wipe).


Well, I have called it done at this point. So it was time to head over the Mary Beth's blog so see how her's was actually done. Mind blowing....
Boy, was I ever close....NOT!
The whole idea of an inspired piece for me is on how I perceive it and its process. So many times I have seen people get caught up in a piece because it doesn't look like the one they are trying to copy....simply, it is because the same person is not creating it.

definition by Merriam-Webster Dictionary
Something to think about for your next #inspiredby work of art!
....stay inspired


No comments:
Post a Comment